Wednesday, October 24, 2012

vintage bleached shorts

Today i'm going to show you how to make vintage bleached cut shorts. These usually go for a lot at the stores or online but they are easy to make and way cheaper.

First, I went to the salvation army but you can go to just about any thrift store and get a pair of old jeans, high wasted or not whatever you prefer.

Then, cutting the jeans can take a lot of time and patience especially when it comes to making it even on both sides. once you get them to the length you want them you can distress the ends with a scissor or just pull it apart with your hands.

cut shorts, diy, distress, fringe, easy


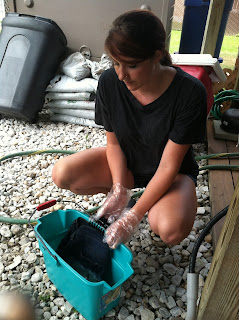
Next, fill up a bucket outside half with bleach and half with water. make sure you are wearing gloves since bleach stains.

Then, put the shorts in the bucket, clipping them so only the bottom half is in the bleach.  Let it sit in the bleach for a couple of hour.
bleach, diy, gloves, shorts

bleached shorts, gloves, diy project, fun

bleach, water, bucket, diy, fun


After, take them out and let them air dry, then wash them and dry them again and they are ready to wear!
diy, bleached, cut shorts, final
enjoy! xoxo

Friday, October 19, 2012

DIY Brown Sugar Face Scrub

So for todays post I was thinking about showing you all something a little different.
There are so many different types of DIY projects including beauty recipes which is why today i'll be showing a DIY face mask that is easy and convenient and a great girls night idea.

face scrub, natural, brown sugar

Brown Sugar Face Scrub 

All you need is: 
3 tbsp. brown sugar
3 tbsp. olive oil
1-2 tbsp. honey 
1. Just mix brown sugar and olive oil in a bowl. 
2. Add 1 tbsp of honey and keep adding more until you get the consistency you desire 
3. Apply to face and scrub gently 
4. Rinse face thoroughly 

With four easy steps and these convenient ingredients anyone can do this!

face mask, brown sugar, scrub, natural ingredients

natural, face mask, scrub, honey

bworn sugar, honey, olive oil, natural, face, mask
Enjoy! xoxo


Wednesday, October 17, 2012

Make your own pair of black slasher jeans- idea from Sabo Skirt

Hey all!

So over the summer I did a bit of online shopping and I was looking on one site in particular, Sabo Skirt. (https://saboskirt.com/) I found the coolest black slasher jeans shown below.
sabo skirt, slasher jeans, diy
These run for $48 on Sabo Skirt so I decided to cut my own pair since I had a bunch of old black jeans lying around.

You don't need much at all, just scissors to cut and you're all set.

All you have to do is pull the jeans nice and tight where you want your slits to be and cut,. Let the freedom be yours to cut as many slits as you want and however big you want them to be.

Make it your own: I sowed bandana fabric on the first slit on each side to give them a different look and make them my own.

Look how they turned out!
diy, slasher jeans cut, easy, edgy, funslasher jeans, diy project, slits, hot, out on the town
 do it yourself, jeans, slits, fun, easy project, cheap, styledistressed jeans, diy, style, girls night out
                           

They are super easy and fun to do. These distressed jeans gives every girl a rad edgy look.

Style them with: a flowy tunic and platform boots or heels  for a cute look perfect for going out at night with friends or style them with a big sweater and moccasins or boots for a comfy stay at home look. 

Hope you all like the idea and I encourage all of you to try making a pair for yourself!
xoxo

Wednesday, October 10, 2012

CD Mosaic Frame

I found the coolest idea on pintrest that is almost too easy and convenient.

Everyone has old cds that are either broken or they don't need anymore.


broken cds


All you need is scissors, tacky glue, a paper mache frame (or a regular frame), Black slick dimensional fabric paint, tweezers, and a scrap piece of thin cardboard (cereal box works just as well).

STEPS:
1. once the cds are broken up into various sizes and shapes, squeeze some glue on the front of the frame and spread it out with a scrap piece of thin cardboard. Then to be safe use the tweezers to pick up the CD pieces one at a time and place in the glue. Keep doing this to full the whole frame.  That's really it!

card board,glue, frame
OPTIONAL STEP:

2. Squeeze some dimensional fabric paint onto a scrap of paper to make sure that there are no bubbles and it comes out even. Fill in extra spaces with broken cd pieces.


fabric paint, broken cds, diy project

 With out the fabric paint you get a completely different look but also still very unique and eye catching.

Look at the difference:

without the paint:
frame, mosaic, cds
with the paint:
frame, mosaic, paint, cds

Both look awesome and are easy to do. Enjoy this great idea and hit me up with some comments letting me know if you tried this or any other of my ideas and how it worked out for you.

One last tip: you can always put a mirror in the middle to make it a mosaic mirror instead of a picture frame. 

I'm eager to know! Enjoy!


Thursday, October 4, 2012

DIY spiked iphone case

So I am absolutely obsessed with studs and spikes and when I saw the idea of a spiked phone case I had to try it!


 6 easy steps and you will have your very own spiked case! Here's How:

 1. First, order 1/2" tree spikes from either studs and spikes or any other place you can find them. All      you have to do is screw them in.

 2. Then, order off of amazon or ebay a plain black silicon iphone case. They are super cheap, no more than 4dollars.

 3.Then, line up and arrange the studs on the case how you want them to be. You will need a total of 43 studs.

 4.After you should take a pen and mark where the spots are.

 5.Then, puncture holes through the case using whatever tool works best for you.

 6.Then put the screws in and make sure they are screwed together nice and tightly.

 There you have it, an awesome spiked phone! From my experience with this case, i've learned it is an excellent conversation starter.

Hope you all enjoy :)